IT’S TIME FOR UNVEILING
My Casita Trailer’s Glamping Makeover
After completing the first interior remodeling, I decided to add more color in the second version of my glamping makeover of a Casita. You will find images of both versions below, along with links to all the “how-to” projects at the end of the page.
Original Setup
The three photos below show the bed setup. We decided never to use the table setup, so we permanently converted it into a bed. One of the BEST investments I made for the camper was purchasing a quality 4″ thick memory foam topper for the bed. I only needed to order a full-sized topper and trim a little off the corners before placing it on top of the original cushions that make up the bed.

2nd Version
Amazing what Pillows can do. I also removed the earlier bedspread and replaced it with a down comforter.

I still haven’t done a thing with the old dinette cushions. Hopefully soon…

Adding the down comforter was a great addition. We camped in Bloomington, Indiana, for Thanksgiving (to visit my daughter and son-in-law), so I purchased the comforter to help keep us warm at night. Unfortunately, we were unable to use it because it was TOO COLD! Yes, Too Cold! Temps were down in the ’20s at night, so these Texans had to keep the heater on all night. The Casita’s heater worked great but was too hot for the comforter!
Fortunately, we always use the comforter when we have our AC on. The insulated carpeted walls of a Casita and the great AC unit for its size keep it nice and cool inside. Perfect for the comforter!
~ ~ ~ ~ ~ ~ ~ ~ ~ ~ ~ ~ ~ ~ ~ ~ ~ ~
Original Setup
The next photo shows where I permanently attached a magazine holder to the wall, dividing the bed from the dinette.

I use it to hold my iPad and hang clips off the wire to have items like my car fob (which I keep close by if I ever need to press the panic button on my Jeep…something I hope I never have to use).
Since storage is KEY in a Casita, I left the space under the bed for placing baskets for food storage. To dress it up a bit, I created this little valance held up with a tension rod.

2nd Version
I added two plastic baskets for food storage from the Dollar Store. I then tied some ribbon through a hole;
held in place with a washer, making it very easy to pull out from under the bed.

~ ~ ~ ~ ~ ~ ~ ~ ~ ~ ~ ~ ~ ~ ~ ~ ~ ~
Original Setup
It seems so long since I started transforming my Casita that I thought I would include a few before and after images to help remind you and me of her transformation.
In this first image, you can see how the Casita looked with the original table set-up and in her new bed mode.

2nd Version
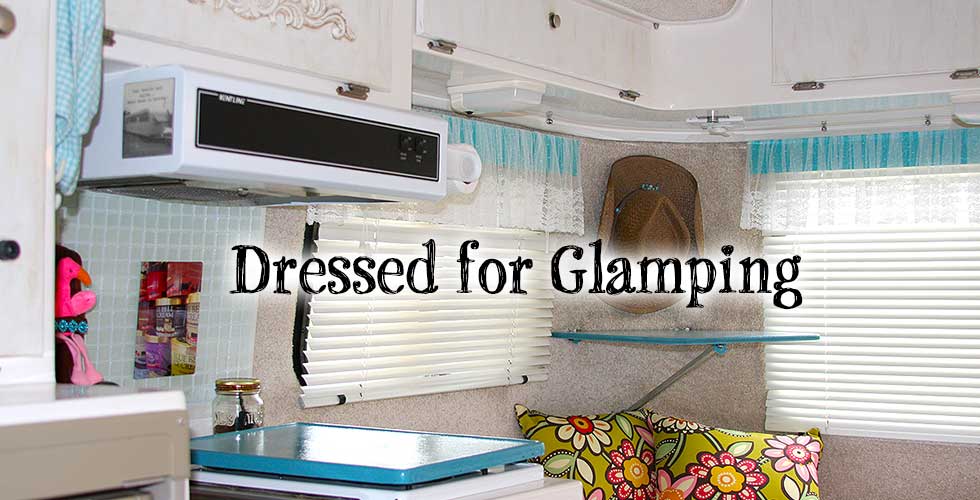
I added my hat to the space above the TV stand (we don’t bring a TV when we camp). The hat is held up with a curtain hook stuck in the carpet. I love it!

Another View

Original Kitchen Before & After
The next photo shows a before and after kitchen area with chalked painted cabinet doors with wood accents, teal-painted stove top cover, and glass tiles.

2nd Version of Kitchen
Includes view of the painted refrigerator door and “Mingo,” my Flamingo!


I couldn’t resist adding the “Hen House” sign since my Casita is a little brown egg named “Farm Fresh.”

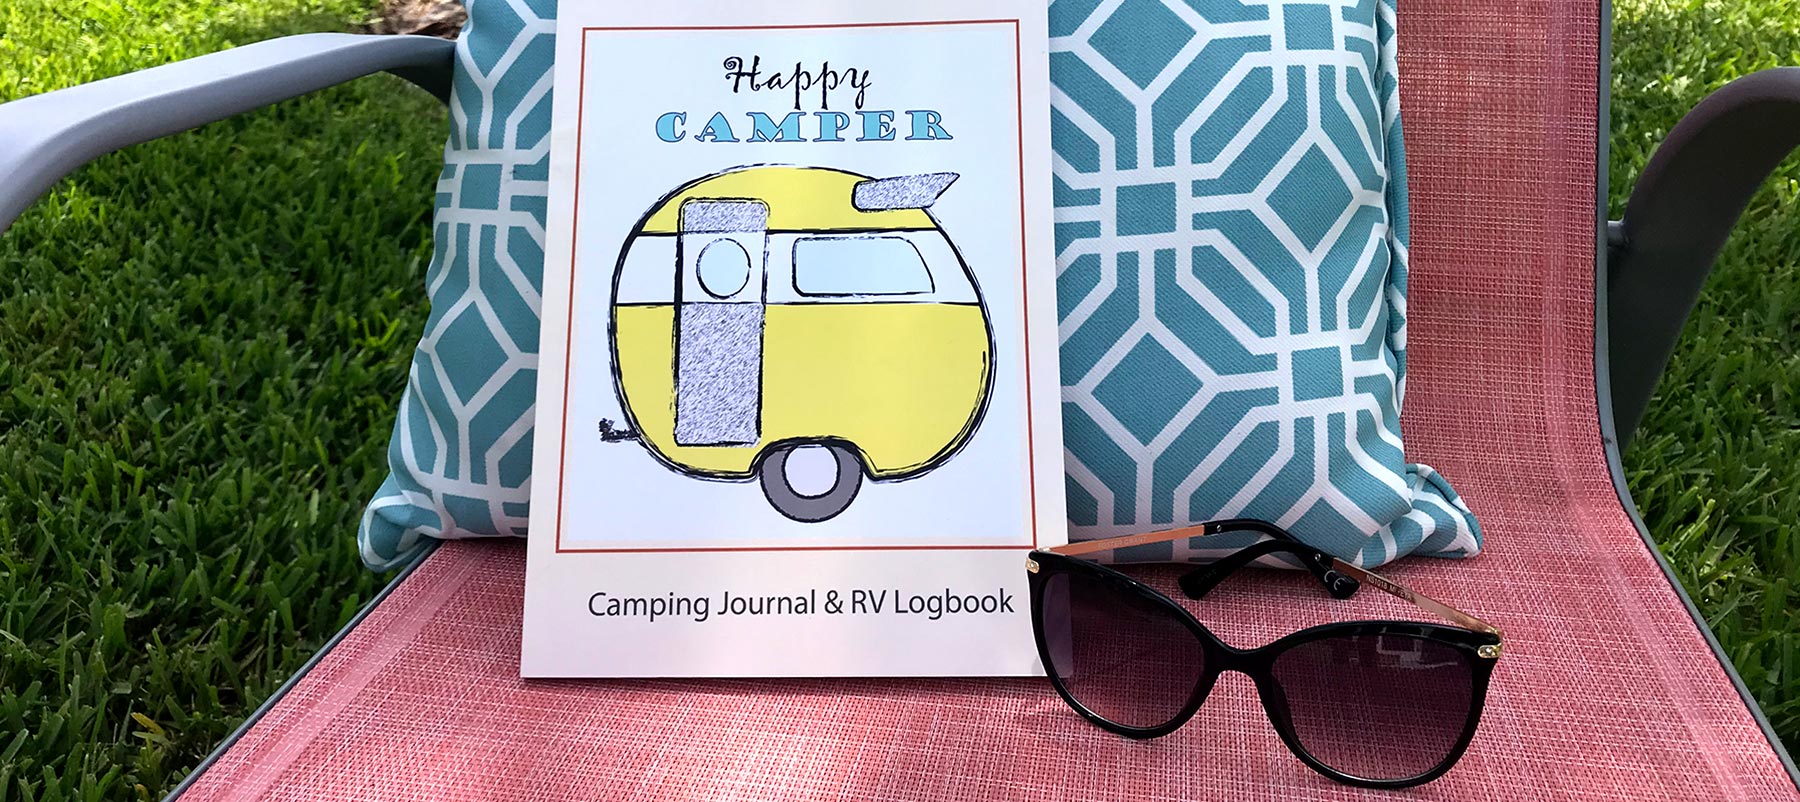
Want to keep track of all your camping memories and details?
Then order a copy of Mrs. Padilly’s “Happy Camper” Camping Journal
& RV Logbook!
Click HERE to get your copy today. #ad
Original Images
These last images show a before and after of the dinette area with a chalk-painted table, doors, and a new rag curtain.

2nd Version Image
I added this cute ornament from my recent Fredericksburg and the Hill Country trip. I love personalizing my Casita with items I collect while traveling.

The ONLY thing I did not change at this time is the original cushions for the dinette. My original intention was to do so, but the fabric on the cushions fit right in with my color scheme after completing the interior. I will admit it’s not my favorite pattern or material, but I figure this is good enough for now…until I can find an excellent no-sew project for seat cushions. Any suggestions???
~ ~ ~ ~ ~ ~ ~ ~ ~ ~ ~ ~ ~ ~ ~ ~ ~ ~
I hope you enjoyed this series of posts on my Casita camper’s makeover! If you missed any of the posts in the series, select from the list of subjects below.
I will add another series of posts on my glamping accessories in the not-too-distant future, including several fun projects.
But it’s time to start enjoying her and sharing my camping adventures with you.
Happy Trails!
Mrs. Padilly
Last Updated June 18, 2025
Mrs. Padilly’s 17′ Spirit Deluxe Casita Travel Trailer’s Glamping Makeover Series:
Introduction:
Casita Glamping Makeover:
- Chalk Painting Cabinet Doors
- Adding Teal Paint to Accent Surfaces
- Installing a Tile Backsplash
- Installing Wood Vinyl Flooring
- Stenciling the Screen Door
- Window Treatments
- Dressed for Glamping
Check out my Shasta Makeover Series. Just click below to go to the first article in the series.
* * * * * * *
Discover more from Mrs. Padillys Travels
Subscribe to get the latest posts sent to your email.
I’ve never had the opportunity to inspect any Casita in person. But, looking at the pictures and diagrams, the dinette looks awfully small to accommodate prolonged occupation for doing clerical work. But, while the Freedom captains chairs seem to offer much more room and flexibility, they take up a lot more living and storage room. You have lived with the Spirit dinette limitations. How do you compared its practicality and livability to captains chairs?
We considered the captains chairs, but with our large dinette converted to a permanent bed, we needed the small dining table. Also, storage is at a premium in a Casita, and we did make use of that space.
Love your “glamorization” of your beloved casita. I’m saving up for a casita of my own and enjoyed reading your ideas for personalizing it!
Thank you! If you are in Facebook, look for the Casita Owners group and join (you don’t have to own one yet). It is a great, passionate group of owners. I think you will enjoy! ☺️
Hi Mrs. Padilla! I purchased a new Casita for myself as a retirement gift and absolutely love it. I have been looking for ways to personalize it and love your makeover. I have been so inspired by your blog and how to’s. I really would like to put up a lightweight curtain by the bed to separate the bed (I get up and read and husband sleeps in). Understand that when not in use should not be fastened next to stove. But how to mount it? Would a shower tension rod work? Any thoughts on this? By the way, do you go to the Bluebonnet Rally? Thanks!
Happy New Year, Maudie! I am so glad you have been inspired by my makeover of my Casita. 🙂 As for your question regarding placing a lightweight curtain next to the bed, I have never done that myself, but your idea of a shower tension rod sounds like it might work, and yes, if you use your stove you would want it to move beside the panel the separates the bed from the dinette. I am actually considering do the same thing in my new Shasta Airflyte Reissue. If I do, I will be posting on it later this spring.
Regarding the Bluebonnet Rally, I have never had the chance to go, but have been told about it. Sounds like it is a lot of fun! Unfortunately, I will no longer get a chance to as I am preparing the Casita to sell due to the purchase of my new Shasta Airflyte Reissue (we needed more space). I’ve actually purchased the Shasta last summer, but have been reluctant to put the Casita on the market as I enjoy it so much! But having two trailers is one more than I personally need, so we are preparing her for sale soon. It will be sad for me, but hopefully a new owner will like her makeover enough to make it her own. 🙂
Hope I have been able to offer you some help.
Happy Trails!
Mrs. Padilly
I recently discovered your blog via Pinterest and find your makeover is simply darling. There’s a chance I may be getting a Casita so I’m interested I learning the tricks to remodeling a fiberglass trailer. My first question though is how you changed the exterior color. Is it painted or is it a wrap? If painted, did you do it yourself or was it professionally done? That’s the first thing I’d like to do to mine.
Hello Bunnymom3! I’m afraid I can only tell you so much about the color of the Casita, as it was that color when I purchased it. It is painted on, and looks to be a high grade, sprayed on paint like you would find used on boats and airplanes. If I had to guess, the original owners had it professionally done since the paint quality and adhesion is so good. Sorry I can’t give you more information about the paint. Good luck in your pursuit of a Casita! Happy Trails!
That’s okay, thanks for letting me know. I’ve seen a few that weren’t white do I was curious. I’m still interested in one though.
Beautiful! I’m on my way to look at a 1993 16′ Casta right now! What year and model is yours?
Mine is a 2006. Have fun with your new Casita!!! 😄
I just love the colors and especially your cabinet accent. What a clever idea and one I intend to use. The hub and I bought a 1974 prowler. It’s rough but we are slowly getting it together. For cushions I’m doing plywood backing. Stapling the material and using Velcro to keep the backs in place. That’s the plan. 😉 we will see how it goes. She won’t be complete for a while yet.
Hi Diane,
A 1974 Prowler, how fun! I have thought of doing the same thing as you with the cushions (adding plywood as a backing). The one thing I have not updated on my Casita is the cushions, because I hate to sew. It’s not that I can’t do it, I just don’t like doing it. Don’t really know why, lol, which is probably why I am so impressed with talented seamstresses!!!
When I tackle updating my Casita to the “Texas ranch” theme, I will be doing the cushions…my time of reckoning is at hand.
Have fun as you glamp your Prowler! Thank you for your kind words.
Happy Trails!
I realize that I’m “really late to the party” but you can simply wrap the cushions like a gift…use large safety pins to keep the ends closed… the pins would replace the places you would use scotch tape. Very easy as well as easy to change when you want to switch out the fabric!
No one is ever late to this party! That is really a great idea. I’ve seen some examples before on Pinterest, and so glad you reminded me of that. Thanks for your comment, and Happy Trails!
Did your camper come with blinds already? If not, how did you install them?
And how about the curtain rod that you tied the valance on? Was it there or did you have to install it too?
If you did have to install on the above items, please tell me how you did that. I am so worried about screwing into the walls and compromising the fiberglass. I don’t want to chance causing any leakage what so ever.
I look forward to your reply. thanks so much and you have done a fabulous job!
Hi Lesa, The blinds are factory installed by the manufacture.
As for the curtain rod, I did install it. And you can see how in this post. 😊
Window Treatments for my Casita Travel Trailer | Mrs. Padilly’s Travels
http://www.mrspadillystravels.com/window-treatments-for-a-casita-travel-trailers-makeover/
As for screwing into the fiberglass, I wouldn’t do that for the same reason you are concerned; creating a leak.
However, the internal MDF panels can be screwed into, and I have done that to hang a magazine rack.
One tip if you do want to hang something lightweight from the carpeted walks, buy a drapery hook and stick it in the carpet. I do that to hang my hat off the wall!
So happy to hear you liked the makeover! 😊. Sorry I took so long to reply.
Happy Trails! Mrs. Padilly.
How did you paint your fridge? You really have done a great job.
Connie, there are screws on the top of the fridge door. When you remove the top frame you can slide the panel out, paint, and then slide back in once dry.
I love your ideas. I have a vintage trailer, travel trailer, and recently purchased a conversion van – I am a campaholic.. lol Thank you for sharing
Thank you, Lynn. I hear there is no cure for campaholics. 😉 Lucky you! 😄
I just began following you today. I hope to be full-timing within the next year and am weighing my options. I like certain things about the Casita but hated the interior. Yours makes me re-think that a bit. We’ll see. At any rate, you have done a beautiful job with yours. Happy travels. MB from VA (for now)
Hello, MB. Thank you for your comments. I purchased my Casita with a dislike of the MDF wood look doors, old vinyl floor, and carpeted walls (although I understood why the walls needed to be carpeted).
The two things I disliked the most, the look of the doors and old floor, I was able to change to my liking with my floor makeover and chalk painting the cabinet doors.
What I discovered about the carpet, however, is how wonderfully insulating it is. It makes for a very quiet and cozy interior when the windows are closed. I have also found that the carpet is great for hanging things! All I do is take drapery hooks, and stick them in the carpeted walls to hang what I want.
How wonderful that you may be full-timing it in the next year! I look forward to that day when Mr. Padilly can retire and we can do that as well!
Thank you for following along! 🙂
I just found your blog today and love it! It’s great what you’ve done to make it “your own”, and it looks beautiful! As a fellow Casita owner, let me show you mine. My clever hubby has made more than 104 notable mods, and we’ve had right at 13,000 views to our flickr photos. Remaining mod: Two window boxes with pink geraniums for the other side, under the cute awnings. Check out our screen door! . Bed has been re-engineered to go from table to bed, fully made up in less than a minute! We love our Dinky – so named for the dog tied to the bumper in the movie “Family Vacation”. We hope ours never meets the same fate!
Linda
https://www.flickr.com/photos/rfpd300/albums
Oops! Wrong FLICKR link! Try this one: https://www.flickr.com/photos/rfpd300/albums/72157626742329244
Oh, my Linda, there is a VERY talented woodworker in the family! The screen door is just beautiful!!! I’m going to show Mr. Padilly your photos. He enjoys woodworking, too. Maybe this will provide inspiration. Also, you’ve figured out what to do with the tissue box! It always seems to be in the way in my Casita! Love everything! I’m so happy you have found my blog, but especially happy you shared pictures of your Casita!
For the cushions you can do a no sew envelope cover and velcro it. You cold your fabric just like a present and place velcro squares to hold your fold in place…does that make sense? I did it on a bench cushion my grandchildren sit on can take off to wash. The cushions in mine are not attractive at all. Going do slide on cases for them so they can be washed. BUT I love sewing. Lol
Yes, it does make sense. Are all folds on the bottom (i.e. points of folded wrapping paper), or do you have the folds come together on the edges. I thinks this could work. Thanks! 🙂
Folds are all on the bottom. I did a trial on a rectangular piece of foam.. found that if the fabric is very thick make sure foldover spots are short and stretchy fabric is a pain in the you know what! Lol
Wonderful. Thank you for these tips! 🙂
About the stretch.. it will work if it’s a check or a distinct pattern. Then you just make sure it’s squared on the pillow. Just tried it with a striped.. to thin what used so will buy a heavier stretch maybe. At least it can be a fabric option anyways.
🙂
I really love what you did to your Casita. I have a 1999 Casita Freedom. I am trying to make it my own. Not doing as good as you. My husband took out the swivel chairs and made a bench (small bed) where your dinette is. I took out the blinds and just have curtains. I think I’ve seen your camper on the sisters on the fly web site. I’m a sister. I’m from Nebr. You Texas girls are talented when it comes to décor. Who painted the outside of your camper?
Hi Sister 1845,
Thanks for your comments, but I’m sure you girls from Nebraska are just as talented. I almost considered the Casita Freedom. Loved that it had swivel chairs, but when I realized that you lost the storage underneath I went with the Spirit. Kind of a trade off; comfortable swivel seats or storage. Boring storage won out for me.
We are the second owners of our Casita, and it was painted brown by the original owners. It was one of the things that drew me this this little brown egg. 🙂
So happy you found my blog. I hope you decide to subscribe and follow along. In the next few months I will be creating a page where my readers can submit their own before and after pictures on restorations and other fun projects related to camping and boating. Many readers have shared what they have done, and I thought it would be fun to put a page here that we can share!
Hopefully I will meet up with you at a Sister’s event. I’ve started calling myself the “Sister on the Shy.” Texas is a BIG state, and all the fun sister events seam to be held way to far for me to get to at this time. It is a 2015 goal of mine to change that!
Happy Trails,
Mrs. Padilly
Sister #4869
Great makeover – but then again – look who was doing it!! Congrats Mrs Padilly!!
As Goofy would say, “Oh Gawsh.” 🙂
Great fun! Now enjoy it. I can’t wait to get my camper out for a summer drive.
Thanks, cteachr! Today would have been a perfect day! Temps almost hit the 80’s and the sun was shining! Texas in the wintertime. 🙂