I think most of you will agree that giving a name to your travel trailer is one of the “funniest” steps towards making your glamped trailer your own.
Your trailer’s name creates its personality, and it says something about you. It’s your personal brand, with a goal that you will be recognized by it. Just like “Free Range” clearly reflects the theme of my brown, farm-fresh Casita Travel Trailer, and “Miss Roxie” reflects my Texas-themed Shasta Airflyte reissue.
“Free Range”

“Miss Roxie”

I carefully think about the name I will give my trailer. I want to make sure it will reflect the theme I am trying to create. If done right, glampers will recognize my trailer at campgrounds I stay at and reflect a part of my personality.
That’s is the fun part of glamping — being recognized for your unique glamping trailer and getting a chance to show off all your hard work!
* * * * * * * * *
What is Branding?
In all fairness, I do have some experience with logos and branding. Before creating my alter ego, Mrs. Padilly, I taught in the field of visual communications. I taught courses in graphic design, multimedia, animation, and web design for almost two decades, and understanding branding is a key concept in these fields. While you may not be striving for a career in visual communications, I suggest you think of yourself as a brand.
A Brand is defined as: noun 1. a type of product manufactured by a particular company under a particular name.
Let’s take that definition and apply it to YOU and YOUR TRAILER by rewriting the definition above:
1. At type of
productglamping trailer thememanufactureddesigned bya particular companyYOUundera particular namewith your trailer’s unique name.
Did that help? Do you see how your trailer’s theme is the product you want to promote with a unique name? That YOU are the company that created it?
Since you are the company that created it, you want to do your best to chose a name for your trailer that is a reflection of YOU and your theme.
My goal with this post is not to teach you how to become branding experts but to get you to think about the importance of your trailer’s name and how you apply it.
To help you with that, I decided to share my HORRIBLE experience re-branding my Shasta, Miss Roxie, plus provide you a few tips you might want to consider:
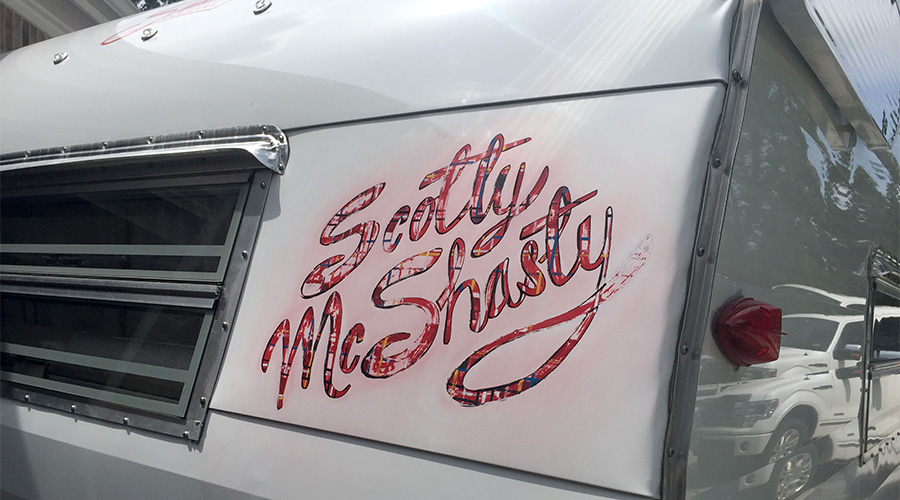
Meet Scotty McShasty:
As the second owner of Shasta #1185, the original owners chose a name to create their trailer’s personality. I must admit it is brilliant.

I suspect the “personality” of the name may be based on the owner’s heritage. Well done, and beautifully PAINTED.
AUGH!!! PAINTED!
Now, I have NO problem with painting names and designs on your trailer — after all, it is YOUR trailer. But, if you plan to SELL your trailer one day, especially if that could be sooner than later, you might want to think about HOW you apply the name to your trailer.
For example, the previous owners of my Shasta (the original owners) owned her for about one year. Yet, they added a name to the trailer that could literally have lasted the trailer’s lifetime. Not only did they paint the name on the back of the trailer, but there were also other small paintings (one by the door and one on the rock shield) that they tried to remove before selling.
* * * * * * * * *
I knew the logo on the back of the trailer was going to be a challenge to remove. Because of this, I had two choices:
- Do not buy the trailer because of the painted logo.
- Buy it, and deal with the job of taking it off.
I chose the second option by convincing myself it would not be too hard to remove the name; I greatly UNDERESTIMATED that process.
Because of the thickness of the paint used to create this trailer name, painting a new layer on top of it wasn’t a good option. Also, because the colors are so vibrant and bold, it could need several paint coats to achieve coverage.
All that I had left to do was remove it, a task a lot more laborious than I thought. The following images should clearly show you what I mean.
Removing the Painted Name:
The first solvent I used to try and remove the paint was a Goo Gone type of product. Some glampers had success with this, but it didn’t scratch the surface of thick ol’ McShasty.
The second tip was to use Mineral Spirits, which is an excellent idea as painters use mineral spirits to help dilute their paint. I was certain this would work, so I gave it a try, but again very little was happening, and after an hour, I gave up.


Time to bring out my secret weapon:
I was becoming very discouraged with my attempts to remove the paint. It was time to bring out my treasured bottle of Pine-o-Pine.
I purchased this bottle back in the 1990s but NEVER used it to clean my counters or floors. It was my artist’s secret weapon. It is my go-to product for getting paint off my clothing, even paint that has been placed through many cycles of a clothes dryer!

I reasoned if the Pine o Pine could get the paint out of my clothing, it could get the paint off the back of my travel trailer. This 20-year-old bottle of Pine-o-Pine appeared to be doing the trick.


It’s was working, but not on the thickest parts of the paint. It would need some help.
Sandpaper:
There was only one choice left, the use of sandpaper on the thickest parts along with the Pine-o-Pine.


It worked! However, it was not an easy process, and it DID NOT come off without damage to the paint on the trailer.


I’m amazed that the only areas where the damage occurred are literally where the painted trailer name was. The original paint of the Shasta was almost unharmed, even after all the paint removers and sanding! If you have an answer to why that one happened, I’d love to hear it!
Repainting the Surface:
Now I need to repaint the area where the old trailer name was. Fortunately for me, they applied the name to only one panel of the Shasta. Now I had to decide between spray painting the surface or brushing the paint on.
If I spray painted the surface, it would require me prepping the back and side of the Shasta (including the wing) to avoid getting overspray on the other surfaces. Because of the amount of time in prepping and the greater risk to other surfaces, I decided to paint that section.
I used marine-grade oil-based paint, getting the color to match as close as I could.


At least I have a nice clean slate…
Creating a New Trailer Name:
In my opinion, unless you are going to do a unique full trailer paint job or wrap, add a name using VINYL.
The next image shows the vinyl sticker I added to my Casita Travel Trailer, Free Range. I ordered that one from a company that makes vinyl sticker transfers for boats, and I also found a company that could take my Texas Padilly logo and put it on a tire cover. I loved the results!

To make the vinyl sticker for my Shasta, I designed my own sticker and printed it using my Silhouette Cameo (affiliate link) vinyl printer. Vinyl paper is in two parts: the actual vinyl that becomes the lettering and/or design and the vinyl sticker’s paper backing. After you design and print it on a vinyl printer, what you are left with is your design on the vinyl paper’s backing.
Appling my Vinyl Transfer:
Before I could apply that to my Shasta, I first applied gridded transfer paper to the front of the vinyl sticker. The transfer paper makes applying the vinyl MUCH easier. I then taped it to my Shasta, but take notice that I did not tape the right side (“xie”).

With the vinyl sticker held in place with the blue tape, I began to pull the sticker’s backing off from the right side. Look closely at the next image below. The image below shows how the sticker and clear transfer paper are attached to the Shasta.

The left side of the sticker still has the paper backing of the vinyl sticker paper. On the right side, I removed this paper and pressed the lettering down (covered by clear gridded transfer paper). Applying the sticker in this fashion helps you get good adhesion and helps avoid air pockets. It also helps make sure your transfer does not move while you are applying it.
The next image shows me removing the left side of the paper backing on the vinyl sticker. Being care to smooth out as I go along.

This is what the vinyl sticker looks like at this point. I have removed the vinyl sticker’s backing paper, and the transfer paper is still covering the sticker. You will see why I left two pieces of blue tape shortly.

Now it’s time to remove the transfer paper from the vinyl sticker, making sure none of the letterings try to lift. I do this by pulling the blue tape I’ve attached to the top of the transfer paper.

Adding Another Design:
The first part is now done. It is time to add the rest of the trailer’s name and design using the same steps above.
Next, I apply another vinyl sticker design. Notice all around the vinyl sticker; the white paper is still attached (bright white on edges).

Using the tape as I did above, the picture below shows that I removed the paper backing on the bottom and right side of the vinyl sticker, but the transfer paper remains. Note: the transfer paper I used on this sticker is more opaque versus the clear transfer paper I used on the “Miss Roxie” vinyl. I did not have any clear transfer paper left, so I had to use what I had on hand.

I removed all backing paper and will remove the transfer paper next.

Almost done, and I added a third vinyl transfer with the limited edition number of my Shasta: #1185.
![]()
![]()
Looking Good!
My Shasta has a new name! Notice I also included some vinyl sayings to decorate the inside of the trailer’s door. To learn how I did that and more, click here.
![]()
![]()
She’s Rebranded!
Wow! I’m exhausted! Writing this how-to post on the rebranding of my Shasta reminded me of how much work I had to do. If the original owner didn’t custom paint a name on his Shasta, we could have avoided all this. Or, I could have chosen not to buy, but with so few of these “limited edition” Shasta’s created, that wasn’t an option for me.
Suppose you take ONE tip away from this post when you add the name to your tailer, design, and apply a name that WORKS BEST FOR YOU! However, keep in mind how your design might affect the sale of your trailer should you decide to sell. Also, keep your brand in mind, and have fun decorating!
Conclusion:
Personally, I am a BIG BELIEVER in making your trailer your own! I hate owning something, only to worry about doing something that might hurt the value of my trailer if I had to sell.
My observation has been that most of the remodeling, updating, and painting we do to our trailers helps when it comes time to sell.
The only exception I see to this observation is when you give a trailer a name. Trailer names are personal.
In my experience, most second+ owners of glamped trailers either keep the trailer’s design or enjoy modifying it, but ALMOST ALL new owners will change the name. You might want to make sure that changing the name is easy for them. 😉
Have fun branding your glamping trailer!
Happy Trails!
Mrs. Padilly
Shasta Makeover Series:
(Links will become active as each article is posted):
- Decorating My Shasta’s Screen Door.
- Creating a Cute Flower Box for a Travel Trailer
- Yikes! I cut up my vintage dinette to turn into a permanent bed.
- Installing a flexible dining table in your travel trailer.
- Adding a name to your travel trailer? Read this first!
- My Shasta vs. My Casita: An Honest Review
Check out my Casita! The Makeover Series that Started it All! Click the link before for the first post in the series.
Do you want to Glamp your Motorhome? I did! (Post Coming Soon)
- Should I Glamp my Motorhome? You Bet!
Discover more from Mrs. Padillys Travels
Subscribe to get the latest posts sent to your email.
Great job! 🙂
Thank you. 🙂
Originally, I was as enthusiastic as you are for personalization. But after carefully reviewing the issue under as many use scenarios as possible, I’m now against it. I feel personalization draws attention, which of course many owners seek. One YouTuber has his rig painted like a circus vehicle and he was regularly posting bad experiences with locals. My present attitude is to seek as boring and invisible a persona as possible. In fact, I’m considering visuals that infer intimidation, even threat. How about labeling like “COVID19 RESPONSE VEHICLE” or “SEWER WORKERS UNION SUPPORT VEHICLE”. These epithets may be counter productive in that they also are attention-getting. Maybe a better plan is unlabeled plain old one color boring like utility company equipment that pedestrians are used to and pay no attention to. In short, my game is inconspicuous stealth that can park in front of a police station and not be noticed.
Humm…Interesting. While I’m sure there are a few introvert Glampers out there, I would assume most like to draw attention with their campers. 🙂
We have a 1965 Franklin camper that we’ve been restoring. I’ve named her Backroad Betty. And she’s even got her own Instagram 😊❤️
Backroad Betty – Love it, and I’m now a follower of your Instagram page. 🙂 Happy Trails!