It is not for the faint at heart to cut up a Shasta’s vintage tabletop to be repurposed as a flexible dining table.
This post shows you how and why I took that tabletop and converted it into a flexible dining table using the Lagun table mount system.

The image above shows how my dinette looked before I removed it to make way for a permanent bed: Read “Yikes! I Cut up this Trailer’s Vintage Dinette to make room for a Permanent Bed!” to learn my reasons why and how we redesigned it.
Making the New Flexible Dining Table:
With the original table gone to make the permanent bed, I needed a new place to eat in my Shasta.
The logical spot is to add a new table to the back of the Shasta.
As you can see in the image below, the back portion of the Shasta consists of two couches; one includes a gaucho to pull out and provide more room for sleeping.

advertisement
My First Plan:
My first plan was to cut out a section of our backbench to make way for a small dinette, similar to our Casita’s dinette setup (see picture below or in my post on “My Casita Travel Trailer Before Glamping Pictures”), but I didn’t want to take away from that much-needed sitting/lounging space.

Second Plan:
My second plan was to install a traditional RV table pole/stand on the floor. If you look again at the Casita dinette pictured above, you can see the poll and floor mount system.![]()
I would have mounted it into the white/black checked floor in the Shasta version and centered the tabletop on top. We have a similar setup in our Cambria Motorhome, and I have learned that a single poll with a tabletop attached does not make for a sturdy table.
I was also concerned this plan would take away precious floor space and make it harder to move around and use the bathroom.
More Planning:
So I continued to research other options when I came upon the Lagun table mount system at Marine Teak. Often used in boats, this mounting system fits my needs perfectly. I ordered it, and it arrived quickly and in great condition (great packaging).
Please note, I do want to be clear that I am in no way affiliated with this company and purchased it directly from Marine Teak for my personal use.
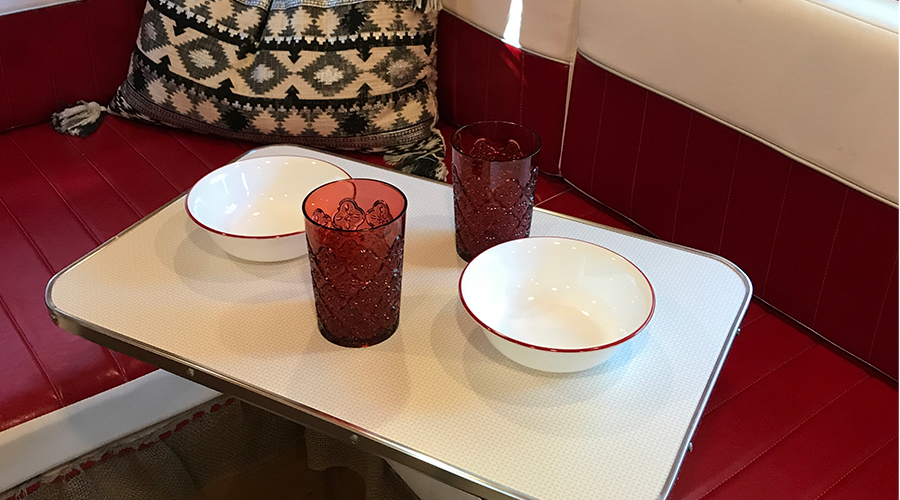
The next photo shows the completed table set-up.
The table works great, takes up NO floor space, and is VERY flexible. To learn how we installed it, and created the new tabletop, continue reading:

advertisement
Original Setup:
Let’s look at the original setup again, and also note the back cabinet/bunk bed I removed in my article “Create a cute flower box for your travel trailer.”
Before removing those cabinets, an adult couldn’t sit in a full upright position with her back against the cushions. That article explains why and how I removed them, along with the construction of the new flower box.
Also, note that if I went with the plan to install the poll into the floorboard of the Shasta, you can see how the tabletop could get in the way of the door to the bathroom (door on the left).
Note in the image below how the original layout included a pull-out gaucho designed to create a larger sleeping space.

This gaucho makes it difficult to get into the bathroom and structurally is not well designed when in use. Because of this, we knew we would never use it. We could better use this space to mount the new table.
Steps for installing the new Lagun Table Mount:
We placed the table mount system on the wall that formally supported the pull-out gaucho. This provided us a good support system and allowed our new dinette to be by the window. The table is also located next to the bathroom, so I designed the space to be used as a vanity area, too.
With our location selected, we removed the cushions, took out the gaucho, and began the process of adding the new support, as shown in the images below.
Mounting a 2″ x 6″
We attach the 2″ x 6″ to the sidewall of the bench, which will be used to attach the Lagun support hardware.

Remove Gaucho
With the 2″ x 6″ attached and the slide-out gaucho removed, notice you can see down into the well of the Shasta. We will need to fix this by putting a new base on top.

advertisement

Install Hardware
With the wood 2″ x 6″ support in place, it was time to install the only hardware for the table mount system.


New Bench Support
Now that the hardware is in place, it was now time to add a new base to cover the exposed space over the bench.
This was an easy step to complete with 4, 1″ x 4″s, and 1, 1″ x 6″ (to get the width we needed for the cushion).

Note the 1″ x 6″ board on the right side of the picture (below). We used a wider board at this point to help support the overhang of the cushion.

After the support boards were in place, we added a sheet of plywood, cut to size, to bring the cushion to the height of the backbench cushion. If you look closely along the base of the back cushion, you can see that it rests on plywood, too.

The bench/dinette modification is complete, and it appears Miss Roxie approves.

The Final Step
The final step to modifying the old gaucho and installing the new Lagun table mount system is to slide it on its bracket, then tighten the handles you see in the image below.
The table mount support is now ready for a new tabletop.

advertisement

Making the New Flexible Dining Tabletop:
To make the tabletop, we reused some of the dog bone laminate from the original dinette. Still, before we could begin, we needed to remove the original hardware and aluminum banding. The images below show the steps that we took to accomplish this.


The first cut was tough to make to the original tabletop. There was no turning back now.

This was also one of the most critical steps in the process. We needed to create a table that would fit the space the way we intended to use it. If we cut it too short, there was no going back.
Table Design Considerations:
This table needs to be flexible since we will use it for dining, laptops, reading, and bathroom vanity. It needs to rotate in as many positions as possible (one of the nicest features of the Lagun table mount system).
advertisement
Our tabletop also had to be smaller in scale to fit the space and have flexibility, but this size may not work for everyone, especially if you eat a lot indoors or have more than two people. But there are only two of us, and we eat most meals outdoors, so this size works well.
The series of images below show you all the steps needed to cut the table down to the size. Please feel free to ask any questions you may have on the process using the comment section at the end of this post.
Cutting the table down to size.

Using a cutting board to make the curve for the corners.

CRITICAL STEP
Before cutting, we decided to test the curve on the cutting board with a piece of the original aluminum edging.

The curve caused the aluminum to buckle because it was too sharp. We would need a more gradual curve.

TRYING AGAIN
This large Disney pin made a better template to draw the curve. It worked great.
Cutting corners marked by the “pin” template.

The finished cut, which we sanded lightly.

Reapplying the original aluminum banding to our new tabletop.

We drilled pilot holes and attached the banding as we went along.

The use of clamps helps make this process go easier.

The “pin” template made a nice curved edge for the aluminum banding to go around (see below).

We marked the overlap after attaching the banding and then cut the banding to fit.

advertisement

Attaching the New Flexible Dining Tabletop:
With our tabletop complete, it was time to attach it to the Lagun system. Attaching the tabletop is easy using the table mount’s six pre-drilled holes.
We placed the new tabletop on the table mount system and then attached it with six screws from underneath.
If you look closely at the next image, you can see three of those screws. Also, note how far we placed the tabletop to the right of the table support. To get the rotation we needed, we could not center our tabletop. You have total flexibility as to where you want to mount it to your table.
TIP: Before you attach the tabletop to the mounting system, move it around to make sure it moves freely in the space.
advertisement

The last few images show all the positions we can position the table, depending on our needs. It is as simple as loosening and tightening the levers.

advertisement


Flexible Dining Table Project Complete!
The tabletop turned out better than I expected. It is very functional and provides a wonderful spot to eat and work.
My repurposed Shasta dinette is now a useful flexible dining table. I couldn’t be happier!

In my next post, “The truth about vintage trailer bathrooms,” I show you how I use our new table to create an expanded bathroom space. The image below gives you a hint.

Although the decision was hard to make, I am pleased I removed and cut up my dinette. We now have a great place to sleep and a flexible place to eat!
I will now turn my attention to my Shasta’s tiny bathroom and how I can make it feel bigger.
Again, if you have any questions, concerns, or comments on this table project, please ask me in the comment section below.
Happy Trails!
Mrs. Padilly
Shasta Makeover Series:
(Links will become active as each article is posted):
- Decorating My Shasta’s Screen Door.
- Creating a Cute Flower Box for a Travel Trailer
- Yikes! I cut up my vintage dinette to turn into a permanent bed.
- Installing a flexible dining table in your travel trailer.
- Adding a name to your travel trailer? Read this first!
- My Shasta vs. My Casita: An Honest Review
Check out my Casita! The Makeover Series that Started it All! Click the link before for the first post in the series.
Do you want to Glamp your Motorhome? I did! (Post Coming Soon)
- Should I Glamp my Motorhome? You Bet!
Discover more from Mrs. Padillys Travels
Subscribe to get the latest posts sent to your email.
nice post- I have a 16′ Seafoam and will install a small table. did you know that Home Despot has the matching formica tabletop material? I hope my Seattle location has some- I want to leave the original in place
Hi Peter, No I did not. That is great to know for those who want to keep the original table. Thanks for sharing. 😊