We are the second owners of our 1961 Shasta Airflyte Reissue, manufactured in 2015. The manufacturer of the Shasta, Forest River, had a goal to recreate this 1961 beauty as true to its original design as possible. They succeed, but that still did not keep me from tearing things apart.
From cabinet handles to “dog bone” Formica to the Shasta’s trademark magazine holder (and so much more), Forest River worked hard to bring the original version back to life while including those much appreciated 2015 modern amenities.

Because my Shasta was only a year old and a “limited edition,” the last thing I thought I would do is make significant changes to the interior – but I did.
After only a few camping trips in the Shasta, I wish Shasta left some features back in the 1960s. They were not working for us as intended, such as the bunk bed/cabinet space at the back of the trailer.

My Dilemma
After much deliberation (after all, this is a limited edition), I decided to worry more about making this Shasta work for me than worrying about the effects a remodel could have on selling her in the future.
I figured if there was one thing I learned over the last 16 years (after buying and selling four houses, nine boats, three RVs in that time), if you worry too much about the effects of decorating/makeovers on resale, you will always live in your home/boat/RV for someone else.
Bunk Bed / Cabinet Before Remodel
You can see the latch you would pull out to lower the bunk (there is a latch on each side). You would then lower the bunk and latch it into the bracket on the side of the wall (red arrow).

When I first saw the bunk bed/cabinet, I thought, “How nice, but I will never use the bunk.” Then I saw the space behind the cabinet doors and got excited! One thing my trailers never seem to have enough of is storage space!
However, on our first camping trip, I discovered I wanted something MORE than storage space – headroom!
As it turned out, you could not sit upright against the back cushions without ducking your head under the cabinet. The only person who could sit upright here would be a small child. This is a prime sitting space. The bunk bed/cabinet had to go!
Removing the Shasta’s Bunk Bed

It took a little effort to remove the bunk unit (without damaging the walls) because the frame was screwed and stapled to the walls. We also discovered something else; this bunk unit had been removed and then reinstalled by the previous owners (verified this by looking at it on their Facebook page). They obviously needed more headroom, too! 🙂
But unlike the previous owners (who reinstalled the bunk unit), I was about to make a decision that would forever prevent me from doing the same; I decided to cut it up.
Cutting Up the Bunk Bed

While I wasn’t a fan of the lack of headroom the bunk bed/cabinet created, I LOVED the scallop edge on the front of the cabinet.
I did not want to lose that feature of the Shasta, so I had my husband saw it off to use it in a flower box. I would then place this flower box where the bunk bed/cabinet was, and the scalloped trim would become the decorative front.

Building the Flower Box
With the scallop removed from the cabinet, it was time to build the flower box. The next few images show you the steps we took. I started with a 1 x 4 piece of lumber, which I would place along the back of the trailer using these small brackets as support on each side.

I then placed the board on top with the brackets in place and secured each end using screws from the top. You might also note that the damage from the staples still appears on the walls. I decided not to worry about fixing these holes since flowers would soon cover them.

advertisement

With the shelf in place and secured on each side, Mr. Padilly took the extra step of securing it to the back wall by using pocket hole screws under the shelf.

Now that the shelf is in place and secure, it was time to add the scallop from the original cabinet.
To do this, I decided to use wood glue. I did not want any staple damage to the scallop trim, so I applied the glue and secured it in place with a couple of finishing nails so it could dry correctly.

advertisement

Adding Styrofoam
Now the real fun begins, adding the flowers to the flower box. The first step to putting in the flowers is to cut some styrofoam to use as support. I cut the styrofoam 3″ wide (I wasn’t too worried about being correct) and cut enough to fill the box.

Once I had the styrofoam I needed, I added hot glue to one side, then set the glued side down inside the flower box (I do not glue in the flowers).


Adding Flowers to Box
It is finally time for the flowers, and Miss Roxie has waited patiently. Too bad she didn’t fix her hair before being photographed…

I have to admit to rearranging the flowers for well over an hour. I first thought of grouping my poppies (I love this wildflower), but it just wasn’t working.

Then I decided to start by placing the white flowers first. This picture gives you a good idea of how I placed the stems (no glue, just stuck into the styrofoam).

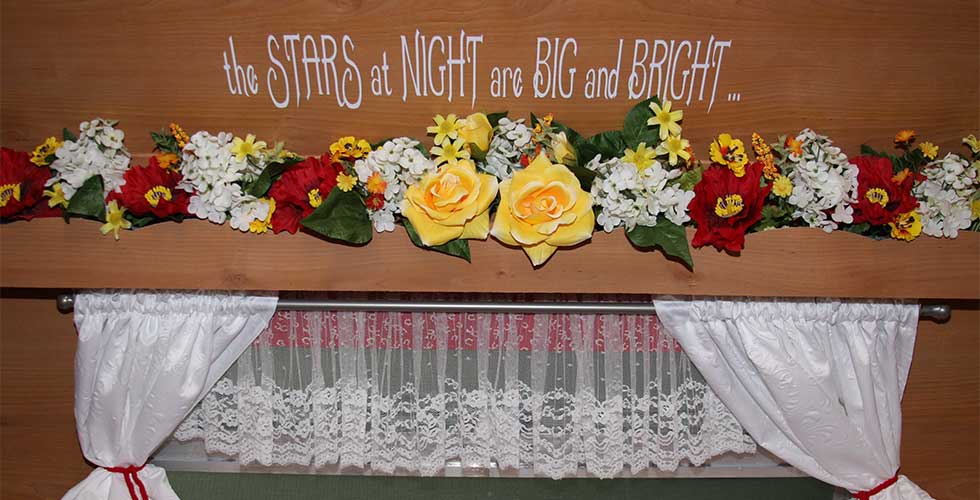
After several more tries, I ended up with this arrangement. I’m happy with the mix and showcasing the “Yellow Rose of Texas.”

advertisement

Adding a Vinyl Transfer
With the flower box complete, I needed to add one more element using my vinyl printer. I figured this was the perfect spot to add a few words from one of my favorite Texas songs.

After carefully placing my vinyl transfer (so I thought), I rubbed the transfer securely to the wall.

Once the vinyl lettering was securely attached, I slowly removed the transfer paper, making sure none of the letters were lifting off.

Perfect! Well, not really. I am compulsive about balance, and sadly the words are a little too much to the left over the yellow roses.

I do not want to peel off the vinyl and make another transfer, so I will fix the alignment by adding another element. You will see this final element in a future post titled “Glamping Makeover Revealed: Showcasing Miss Roxie.”
Until that reveal, I hope this article inspires you along with the makeover of your own trailer!
Happy Trails,
Mrs. Padilly
Shasta Makeover Series:
(Links will become active as each article is posted):
- Decorating Your Camper’s Door.
- Create a Cute Flower Box for Your Travel Trailer.
- Yikes! I cut up my vintage dinette to turn into a permanent bed.
- Installing a flexible dining table in your travel trailer.
- Adding a name to your travel trailer? Read this first!
- My Shasta vs. My Casita: An Honest Review
Check out My Casita Makeover! The Series that Started it All! Click the link below to go to the first post in the series.
Do you want to Glamp your Motorhome? You Bet! I did! (Post Coming Soon)
- Should I Glamp my Motorhome? You Bet!
Discover more from Mrs. Padillys Travels
Subscribe to get the latest posts sent to your email.
🙂
You sure know how to give a travel trailer a homey look.
Thank you, Lee. 😊